Starbeamrainbowlabs

Stardust
Blog


Archive


Mailing List Articles Atom Feed Comments Atom Feed Twitter Reddit Facebook

Tag Cloud

3d 3d printing account algorithms android announcement architecture archives arduino artificial intelligence artix assembly async audio automation backups bash batch blender blog bookmarklet booting bug hunting c sharp c++ challenge chrome os cluster code codepen coding conundrums coding conundrums evolved command line compilers compiling compression conference conferences containerisation css dailyprogrammer data analysis debugging defining ai demystification distributed computing dns docker documentation downtime electronics email embedded systems encryption es6 features ethics event experiment external first impressions freeside future game github github gist gitlab graphics guide hardware hardware meetup holiday holidays html html5 html5 canvas infrastructure interfaces internet interoperability io.js jabber jam javascript js bin labs latex learning library linux lora low level lua maintenance manjaro minetest network networking nibriboard node.js open source operating systems optimisation outreach own your code pepperminty wiki performance phd photos php pixelbot portable privacy problem solving programming problems project projects prolog protocol protocols pseudo 3d python reddit redis reference release releases rendering research resource review rust searching secrets security series list server software sorting source code control statistics storage svg systemquery talks technical terminal textures thoughts three thing game three.js tool tutorial twitter ubuntu university update updates upgrade version control virtual reality virtualisation visual web website windows windows 10 worldeditadditions xmpp xslt

Making Mathematical Art with C Sharp and PPM

The other day I wanted to (for some random reason) create some stripes. Having worked out a simple algorithm that would produce some rather nice stripes given an (x, y) pixel coordinate, I set out to write a small script that would generate some stripes for me.

I discovered that it wasn't as easy as I'd thought. Lockbits confused me, and I couldn't find a good enough example to learn from. Thankfully I caught wind of a ridiculously simple image format called PPM (Portable Pixel Map) that I could use to output a byte[] array of pixel data as a valid image.

Here's a diagram I made to illustrate the format:
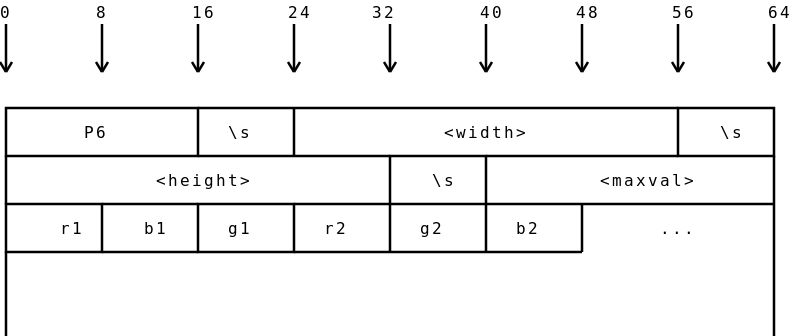
The PPM Format.

The format basically consists of a ascii header, followed by a raw dump of a byte[] full of pixel data. The header contains several parts:

  1. The characters P6 (This is called the 'magic byte', and can be used to identify the type of content that a file contains)
  2. A single whitespace (I used \s in the diagram because that is the escape code for whitespace in a javascript regular expression)
  3. The width of the image, in ascii
  4. Another single whitespace
  5. The height of the image, in ascii
  6. Another single whitespace
  7. The maximum value that the red / green / blue pixels will go up to. This value will be considered 100% saturated. Normally, you'd want this to be 255.
  8. Another single whitespace - not shown on the diagram (oops); usually a new line (\n).
  9. The raw byte[] array of pixel data.

Once you've your pixel data as a PPM, you can then use something like imagemagick to convert it to a png with a command like mogrify -format png image.ppm or convert image.ppm image.png.

Some red stripes.

Using this method, you can generate almost anything using pure C#. Here's the code I used to generate the above stripes:

using System;
using System.IO;

public class EmptyClass
{
    #region Settings

    static string filename = "image.ppm";

    static int width = 1500;
    static int height = 400;

    static int stripeWidth = width / 30;
    static rgb stripeLowCol = new rgb(204, 0, 0);
    static rgb stripeHighCol = new rgb(255, 51, 51);

    static float multiplier = 1f;

    #endregion

    #region Image Generator

    public static void Main()
    {
        byte[] pixelData = new byte[width * height * 3];
        for(int x = 0; x < width; ++x)
        {
            for(int y = 0; y < height; ++y)
            {
                int currentPixel = ((y * width) + x) * 3;
                pixelData[currentPixel] = redPixel(x, y);
                pixelData[currentPixel + 1] = greenPixel(x, y);
                pixelData[currentPixel + 2] = bluePixel(x, y);
            }
        }

        StreamWriter destination = new StreamWriter(filename);
        destination.Write("P6\n{0} {1}\n{2}\n", width, height, 255);
        destination.Flush();
        destination.BaseStream.Write(pixelData, 0, pixelData.Length);
        destination.Close();
    }

    #endregion

    #region Pixel value functions - edit these

    public static byte redPixel(int x, int y)
    {
        return (byte)(((x + y) % stripeWidth < stripeWidth / 2 ? stripeLowCol.r : stripeHighCol.r) * multiplier);
    }
    public static byte greenPixel(int x, int y)
    {
        return (byte)(((x + y) % stripeWidth < stripeWidth / 2 ? stripeLowCol.g : stripeHighCol.g) * multiplier);
    }
    public static byte bluePixel(int x, int y)
    {
        return (byte)(((x + y) % stripeWidth < stripeWidth / 2 ? stripeLowCol.b : stripeHighCol.b) * multiplier);
    }

    #endregion
}

#region Utility Classes
class rgb
{
    public byte r, g, b;
    public rgb(byte inCol)
    {
        r = g = b = inCol;
    }
    public rgb(byte inR, byte inG, byte inB)
    {
        r = inR;
        g = inG;
        b = inB;
    }
}
#endregion

The settings at the top control the appearance of the output. filename is the filename to write the image to, width and height set the dimensions of the image, stripeWidth sets the width in pixels of each stripe, and stripeLowCol and stripeHighCol set the colour of the different stripes. The multiplier at the end isn't actually needed, but you can use it to brighten or dim the resulting image if you want.

Not content with stripes, I played around for a bit longer and came up with this:

Another mathematical picture.

Above: My second attempt at mathematical art. It looks better in my native image previewer...

The above actually consists of a 3 different functions - one for each channel. Here they are:

public static byte redPixel(int x, int y)
{
    return (byte)(Math.Sin(x / (width / (Math.PI * 10))) * 255 * Math.Sin(y / (height / (Math.PI*10))));
}
public static byte greenPixel(int x, int y)
{
    return (byte)(Math.Sin(x / (width / (Math.PI * 5))) * 128 * Math.Sin(y / (height / (Math.PI * 5))));
}
public static byte bluePixel(int x, int y)
{
    return (byte)((Math.Sin(x / (width / Math.PI)) * 52 * Math.Sin(y / (height / Math.PI))) + 25);
}

I don't actually know how it works (even though I wrote it strangely enough), but if you do know, please leave a comment down below!

Since it might be a bit difficult to see, here's an animated gif that shows each of the colour channels broken down:

Illusion Boxes Decoded

Lastly, I have rendered a larger copy of the above. You can view it here (Size: 4.8MB).

Have you made some interesting mathematical art? Post it in the comments below!

Test C♯ code online with repl.it

I've known about repl.it for a while now. It is a site that provides you with a REPL (Read-Eval-Print-Loop) for many different languages, without you having to install the language in question thanks to the native client.

A REPL (in case you didn't know) is like a command prompt, but for a specific programming language or environment. For example, if you type node into your command prompt (if you have Node.js installed), it will start a REPL for you to play around with.

Recently I have discovered that repl.it also supports C♯ (via the mono compiler version 4.0.4.0 at the time of typing), and it lets you write, compile and run C♯ code without ever leaving your browser. I was so surprised by this I thought that I'd make a blog post about it. Apparently you can even embed things you've created into other pages too - here's a small test program I wrote whilst playing around with it:

Links:

Update: Corrected The expansion of REPL.

C++ in Review

I started learning C++ back in September, and I think I've experienced enough of it in order to write a proper review post on it. I've been wanting to do this for a while, as I have quite a bit to say about it.

I think I should start off by saying that C++ is complicated. Very complicated. To the point that you could learn about it for years and still not be half way through everything that you could learn about it. While this offers unparalelled customisablility, it also makes it difficult for new programmmers to pick up the language. Even worse is that whilst something might work, it could easily contain a critical security bug that can be extremely difficult to spot.

It's also difficult (for me anyway) to remember what everything is and what it does. For example, a const int* is not the same as an int* const. I find myself constantly looking things up that I forget over and over again. On top of this, a large number of the core built in functions don't actually do what you'd think they would. For example, getline() doesn't get a line of text, and fail() checks to see if an error occurred whilst opening it. These names can't be corrected in a later version of C++ either - later C++ versions must be able to compile previous versions of the language, including pure C from 30 years ago. Perhaps this is what makes it so difficult to use?

The other thing that makes C++ annoying and difficult to use is how low level it is. You end up having to do almost everything yourself - even things that you'd think would be built into the language already. The standard template library (STL) provides a large number of methods and data strutures to fill in the gaps, but most of these are misnamed too (the vector class is actually similar to a C♯ List), so you end up implementing your own anyway because you can't find the class you want in the STL (only to have someone point it out later).

Thankfully, there is a reason why everyone is still using an old broken language to write important code - it's practically the fastest language out there short of assembly language. No other language comes close to rivalling C++ in speed. Is this the only reason we are keeping it?

Automatic Updating in C#

Once you start writing programs in C♯ that are actually useful, at some point the question of how you are going to deliver updates to your users is sure to come up.

You could upload new versions to your website (and you should!) and ask everyone to subscribe to your blog, but that's a hassle for users. Rather, you want some kind of automatic system that at least lets your users know if there's an update available. It would be even better if it could update itself automatically.

Unfortunately, building a fully automatic update system in C# is not a particularly trivial task, as I have discovered. Thankfully though, I've done most of the hard work for you, so you don't have to.

Before we continue, it should be noted that the code I'm about to show you should not be taken as is. There are several serious pitfalls that I haven't fixed in the code below (some of which I'll point out and explain). Rather, this code should be taken as a starting point for your own system.

To build an automatic updating system, we need to know 3 things:

  1. The local version of the program installed
  2. The version of the program on the server
  3. Whether the version on the server is newer than the version currently installed locally.

These problems are quite easily solved. Let's start with a simple example program:

using System;

class Program
{
    static string version = "0.1";
    static void Main(string[] args)
    {
        // Continue on with the main body of the program
        Console.WriteLine("Rockets are cool.");
    }
}

This is practically a hello world program - yours will be much more complicated than this. Problem #1 is already solved in the above - we have a variable version that contains the current version of the software. Note that it's a a string because in the future we might want more than one decimal point. If you are interested in version numbering, check out semantic versioning. Anyway, let's move on.

The first snag I hit here was that a running C# program cannot replace itself while it is running. This is easily solved, however, by a helper program that will do the actual updating. This presents another issue though, how do we extract the version from the program itself? The helper application won't have access to anything contained within the main program (not without some seriously clever wizardry at least). There are several things we can do here. We could get the program to write out its version to a text file every time it runs, or we could build in a special flag that outputs the version number and then exits. We could also bundle the version number in a separate text file along with the program itself, although this would be prone to tampering. You decide what's best for you.

My solution was to write out the version number to a text file:

// Write out our current version
File.WriteAllText("version.txt", version);
        // Exit now if we were just asked for our version
if (args.Length > 0 && args[0].Trim().ToLower() == "writeversion")
    return;

Next up we need a helper program that can ask a remote server what the latest version of the program is, and download the new version if the version on the server is newer than the version that is installed on the local machine.

We can use a WebClient to download a text file that describes the version currently on the remote server, and the Version class to compare versions. Here's the code I came up with:

using System;
using System.Net;
using System.IO;
using System.IO.Compression;
using System.Collections.Generic;
using System.Text.RegularExpressions;
using System.Diagnostics;
using System.Text;
using System.Security.Cryptography;
using System.Security.Permissions;

class Program
{
    static string remoteVersionURL = "http://localhost:8090/program-version.txt";

    static void Main(string[] args)
    {
        if(args.Length == 0)
        {
            Console.WriteLine("This helper program updates the main program. Call it like this:");
            Console.WriteLine("\thelper.exe update");
            return;
        }

        WebClient webClient = new WebClient();

        switch(args[0].Trim().ToLower())
        {
            case "update":
                Console.WriteLine("Checking for updates...");
                // Format:
                //  <version> <url> <hash>
                string remoteVersionText = webClient.DownloadString(remoteVersionURL).Trim();
                string[] remoteVersionParts = (new Regex(@"\s+")).Split(remoteVersionText);
                string remoteUrl = remoteVersionParts[1];
                string remoteHash = remoteVersionParts[2];

                Version localVersion = new Version(File.ReadAllText("version.txt").Trim());
                Version remoteVersion = new Version(remoteVersionParts[0]);

                if(remoteVersion > localVersion)
                {
                    // Do an update here
                }
                break;
            default:
                Console.WriteLine("Unknown command.");
                    break;
        }
    }
}

The above reads the version.txt file that the main program generates, and downloads a text file from a remote url that contains information about the latest version of the program in question. If you were doing this for real you'd point this as a https url to prevent man-in-the-middle attacks. For testing purposes, I've started a server on my local machine with PHP. I've also added a couple of using statements that we will be using later.

The file that it downloads has several parts. Here's the example file I used:

0.2     http://localhost:8090/release.zip           e8643f52dbaff369614128b9683550879a01c3f4

Where:

  1. The version number stored on the server.
  2. The url at which the latest version can be found.
  3. The hash of the compress file that the url points to.

The third part of this version file is important. We can hash the file that we have downloaded, and if the hash we compute identical to that of the remote file, we know that the downloaded file is safe, assuming that an attacker hasn't modified the version file that we downloaded in the first place.

Next we need to actually do the update. Before that though, we ought to ask the user first. I used a quick Console.ReadLine() loop, but you should probably put together some sort of GUI.

// There is a new version on the server!
Console.WriteLine("There is a new version available on the server.");
Console.WriteLine("Current Version: {0}, New version: {1}", localVersion, remoteVersion);
while (true)
{
    Console.Write("Perform update? ");
    string response = Console.ReadLine().Trim().ToLower();
    if (response.StartsWith("y"))
    {
        PerformUpdate(remoteUrl, remoteHash);
        break;
    }
    else if (response.StartsWith("n"))
    {
        Console.WriteLine("Abort.");
        break;
    }
}

With that out of the way, we can actually do the update. Let's start by writing the beginnings of thePerformUpdate() method:

static bool PerformUpdate(string remoteUrl, string expectedHash)
{
    Console.WriteLine("Beginning update.");
    string downloadDestination = Path.GetTempFileName();

    Console.Write("Downloading {0} to {1} - ", remoteUrl, downloadDestination);
    WebClient downloadifier = new WebClient();
    downloadifier.DownloadFile(remoteUrl, downloadDestination);
    Console.WriteLine("done.");

    return true;
}

Next, we need to use that hash I mentioned above. That particular hash is SHA1 (although you should use SHA2 or even better SHA3), so we need to hash our zip that we downloaded with SHA1:

Console.Write("Validating download - ");
string downloadHash = GetSHA1HashFromFile(downloadDestination);
if (downloadHash.Trim().ToLower() != expectedHash.Trim().ToLower()) {
    // The downloaded file looks bad!
    // Destroy it quick before it can do any more damage!
    File.Delete(downloadDestination);
    // Tell the user about what has happened
    Console.WriteLine("Fail!");
    Console.WriteLine("Expected {0}, but actually got {1}).", expectedHash, downloadHash);
    Console.WriteLine("The downloaded update may have been modified by an attacker in transit!");
    Console.WriteLine("Nothing has been changed, and the downloaded file deleted.");
    return false;
}
else
{
    Console.WriteLine("ok.");
}

The above calculates the hash of the downloaded file, and alerts the user if the hash computed is different to that reported by the remote server. Here's the GetSHA1HashFromFile() method:

/// <summary>
/// Gets the SHA1 hash from file.
/// Adapted from https://stackoverflow.com/a/16318156/1460422
/// </summary>
/// <param name="fileName">The filename to hash.</param>
/// <returns>The SHA1 hash from file.</returns>
static string GetSHA1HashFromFile(string fileName)
{
    FileStream file = new FileStream(fileName, FileMode.Open);
    SHA1 sha1 = new SHA1CryptoServiceProvider();
    byte[] byteHash = sha1.ComputeHash(file);
    file.Close();

    StringBuilder hashString = new StringBuilder();
    for (int i = 0; i < byteHash.Length; i++)
        hashString.Append(byteHash[i].ToString("x2"));
    return hashString.ToString();
}

It's lifted straight from stackoverflow, but it does the job I need it to do. Now we've verified that the downloaded file is (probably) ok, we can proceed to unpack it. Note here that the built in ZipFile class throws an exception if it encounters a pre-existing file, so I'm unpacking it to a temporary directory and moving it from there.

// Since the download doesn't appear to be bad at first sight, let's extract it
Console.Write("Extracting archive - ");
string extractTarget = @"./downloadedFiles";
ZipFile.ExtractToDirectory(downloadDestination, extractTarget);
// Copy the extracted files and replace everything in the current directory to finish the update
// C# doesn't easily let us extract & replace at the same time
// From http://stackoverflow.com/a/3822913/1460422
foreach (string newPath in Directory.GetFiles(extractTarget, "*.*", SearchOption.AllDirectories))
    File.Copy(newPath, newPath.Replace(extractTarget, "."), true);
Console.WriteLine("done.");

// Clean up the temporary files
Console.Write("Cleaning up - ");
Directory.Delete(extractTarget, true);
Console.WriteLine("done.");

A word of warning: The above is windows only! Mono (the open source C# compiler for other platforms) does not support the ZipFile class as of the time of posting. A (much) better and cross platform solution would be to use an external library here, such as SevenZipSharp. You could also use a different archive type to obtain a greater compression ratio, such as .xz or .7z.

If you put it all together, you get a working auto update mechanism. The full source code can be found here: Full source code.

Learning Prolog: Semester 2 Lab 12

The new learning prolog banner!

You may have noticed that I've skipped a week in this series. Don't panic - I've done it on purpose. The task for lab 11 felt very close to the assessed coursework (ACW) for the Artificial Intelligence module that I'm learning Prolog in. I've decided to play it safe and hold off on posting about it for now. I might post later - it all depends on what the ACW is.

Anyway, the main task for this lab was to finish the work we started last week, but there was an additional challenge, too. It was based on the following challenge:

SEND + MORE = MONEY

Each letter stands for a digit, and the idea is to write a Prolog program that work out what each of the letters stands for. This problem is actually quite simple, and the particular way that you'd go about solving this has a special name.

In the beginning, I only knew one way to writing programs: Functional programming. Next, University introduced me to the wonderful world of Object Oriented Programming. In my second year, my AI module has been bending my mind with Symbolic Programming. Now, I have learnt of a fourth programming paradigm - Constraint based programming.

The solution for the above was provided (and explained!) in the lecture slides for this week:


% From http://clip.dia.fi.upm.es/~vocal/public_info/seminar_notes/node13.html
smm :-
    % Let X be the set of variables which I am going to assign
    X = [S,E,N,D,M,O,R,Y],
    % ...and Digits is the unique set of digits to assign
    Digits = [0,1,2,3,4,5,6,7,8,9], /* assign recursively goes through the letter variables and assigns them a digit */        
    assign_digits(X, Digits),        
    M > 0,        S > 0,    
    % multiply to corresponding 10 to the n
    1000*S + 100*E + 10*N + D + 
    1000*M + 100*O + 10*R + E    =:=        
    10000*M + 1000*O + 100*N + 10*E + Y, 
    /*
    This is then the constraint in raw Prolog. =:= checks for equality in the expression.
    */
    write(X).

myselect(X, [X|R], R). % Assign to first and hand back the rest
myselect(X, [Y|Xs], [Y|Ys]):- myselect(X, Xs, Ys). /* ...otherwise on backtracking free up the old binding Y and go get another value of X from the other Xs */

assign_digits([], _List).
assign_digits([D|Ds], List):-
    myselect(D, List, NewList),
    assign_digits(Ds, NewList).

This code works by creating an array of unknowns, an array of digit values that the array of variables can take, and then assigning each of the variables a value one by one. The expression on lines 10-12 is then tested, and if it doesn't match (which it probably won't), Prolog backtracks and tries to reassign one of the variables it assigned before. It repeats this process until it finds the solution.

Brute force isn't very efficient or clever, but it does the job quickly enough:


smm.
[9, 5, 6, 7, 1, 0, 8, 2].

Very nice. But that wasn't actually the challenge to for the lab. The real challenge was to adapt the above code in order to solve a slightly different puzzle:

DONALD + GERALD = ROBERT

Thankfully, all this new problem takes is a slight adjustment to the smm/1 rule that the above solution came with:

dgr :-
    % Let X be the set of variables which I am going to assign
    X = [D, O, N, A, L, G, E, R, B, T],
    % ...and Digits is the unique set of digits to assign
    Digits = [0,1,2,3,4,5,6,7,8,9],
    % Assign recursively goes through the letter variables and assigns them a digit       
    assign_digits(X, Digits),        
    D > 0,        G > 0,    
    % Multiply to corresponding  10 to the n
    100000*D + 10000*O + 1000*N + 100*A + 10*L + D + 
           100000*G + 10000*E + 1000*R + 100*A + 10*L + D    =:=        
    100000*R + 10000*O + 1000*B + 100*E + 10*R + T,
    /*
    This is then the constraint in raw Prolog. =:= checks for equality in the expression.
    */  
    write(X).

All I did was alter the unknown variables to match the new problem. Here's my result:


smm.
[5, 2, 6, 4, 8, 1, 9, 7, 3, 0].

This may well be the last post (Edit:) in this series until the end of the ACW. See you later!

My favourite Atom packages

The atom banner.

A while ago I posted about how much I like the Atom editor. A few months on, and I'm still in agreement: The Atom editor is an absolutely lovely general purpose editor. It's got a bewildering array of plugins, and I thought that I'd share a few of my favourites with you.

Termrk has to be my number one. It adds a toggleable terminal to the bottom of the screen (and presumably other sides too!). This is particularly useful for sorting out particularly nasty version control system problems, or using a quick one liner to process a few files, or starting a development server in the background. If you know your way around the console / terminal, this package is a must have.

Git Plus is also really useful. As you might suspect, it brings git integration to atom. It has a gui for all the common git commands - committing, branching, pushing, pulling, and more. If you use git, install this package.

Minimap and friends are awesome. If you didn't know about the map mode for the scroll bar in Visual Studio (go to tools and search for "map"), this package brings that to Atom. It has a bunch of plugins, too - which let you preview other points on the minimap, or show the current selection, or show changes since the last git commit. Its appearance is simple and uncomplicated, with one 'pixel' for each character - coloured according to that character's colour. I've been finding it to be just what I need when you're dealing with a large complex codebase. (and minimap-titles is an awesome extra too)

If you use multiple computers, sync-settings is worth a look. It synchronises your settings and installed packages by using a Github gist. I use it as a backup for my settings, but it'll be also useful when I finally get around to setting up a portable installation of atom on my flash drive.

There are a ton of other brilliant packages out there that I've found and I could write about them all night, but that would make this post way too long :) If you're interested in which packages I've got installed, I've uploaded a list to pastebin.

Learning Prolog: Semester 2 Lab 10 - Eliza

The new learning prolog banner!

The lab numbering has gone a little bit strange this semester it seems (there was a lab 10 last semester), so I've added the semester number to the post title to avoid confusion.

This week's lab was all about Eliza. In case you don't know who (or what) an Eliza is, Eliza is an early attempt at building a chatbot. It isn't very clever, and relies on keywords to understand what you are saying. It's still used today though - mainly in NPCs in games, as they only have to deal with a very limited situation.

Anyway, let's begin building our very own Eliza. First of all, we need a prompt loop, to repeatedly ask the user for more input:

eliza :-
    write('Hello! My name is eliza.'), nl,
    eliza_loop.

eliza_loop :-
    write('Eliza > '),
    read(Input),
    write('You said '), write(Input), nl,
    eliza_loop.

Here I define eliza/0, which welcomes the user and then jumps into eliza_loop/0, which is the main input loop. The main loop simply writes a prompt, asks for input, echoes the input back, and goes back around all over again. Here's some example output:

eliza.
Hello! My name is eliza.
Eliza > test.
You said test
Eliza > cheese.
You said cheese
Eliza > [1,2,1,2,'testing...'].
You said [1,2,1,2,testing...]
Eliza >

This isn't very useful yet - it just echoes back what we say! Let's make it more complicated:

eliza :-
    write('Hello! My name is eliza.'), nl,
    eliza_loop.

eliza_loop :-
    write('Eliza > '),
    read(Input), respond(Input).

respond(Input) :-
    member(Term, Input),
    member(Term, [ quit, exit, leave ]),
    write('Goodbye!').
respond([my,name,is,Name | _ ]) :-
    write('Hello, '), write(Name), write('! Pleased to meet you.'), nl,
    eliza_loop.

In the above I've changed the main loop up a bit to call respond/1 instead of blindly looping back around. This lets me write rules like those starting on lines #8 and #12 that do something depending on the user's input. We can get our eliza to say goodbye and exit by not looping back around if the user mentions the words "quit", "exit", or "leave", or say hello when someone tells us their name and loop back around again.

There are also two different ways of detecting keywords in the user's input: a double member/2, or a preset list in the rule definition. Examples:

respond([my,name,is,Name | _ ]) :-
    write('You started the input with "my name is".').
respond(Input) :-
    member(Term, Input),
    member(Term, [ quit, exit, leave ]),
    write('Detected the word '), write(Term), write(' in the input.').

While detecting the items in a list is fairly straightforward, the double member isn't as obvious. It works by taking advantage of Prolog's backtracking. It provides a choice point for each word in the phrase, and then it loops over each of the keywords that we are searching for. If it finds that the current word isn't equal to any of the keywords that it is searching for, it will fail, backtrack, pick the next word, and try again. Another way of looking at it is that Prolog is trying all possible combinations of the input words and the keywords until it finds a match.

If you are following this post as a guide, at this point you can (and should!) add your own custom phrases to practice the techniques described here. Once you have done that, come back here.

Next up, we will add some 'fallback' phrases to our eliza to use when it doesn't understand what has been said. At the moment, it just fails with an impolite false., which isn't any good at all! To do this, we need a list of fallback phrases:

list_of_excuses(['I see.', 'Very interesting.', 'Tell me more.', 'Fascinating.']).

Next we need to get our eliza to loop through our list of fallback phrases in order. We can do this by making the fact that contains the list of fallback phrase dynamic, and then updating it every time we use one. To make something dynamic, you use the dynamic/1 predicate to tell Prolog that fact is dynamic and not static (this is because Prolog applies some clever optimisations to static things that don't work for dynamic things):

:- dynamic list_of_excuses/1

You can use this to tell Prolog that anything in your Prolog program is dynamic. Just change list_of_excuses to the name of the fact or rule, and change the 1 to the arity of the fact or rule that you want to make dynamic.

Next, we need to add a 'catch all' rule at the bottom of our respond/1 definition:

respond([ _ ]) :-
    retract(list_of_excuses([ Next | Rest ])),
    append(Rest, [ Next ], NewExcuseList),
    asserta(list_of_excuses(NewExcuseList)),
    write(Next), nl,
    eliza_loop.

Several things are happening here. firstly, we retract the list of fallback phrases from Prolog's knowledge database and split it up into the first item in the list, and the rest of the items in the list.

Next we create a new list that contains the phrase that we at the front at the end, and then we put this new list back into Prolog's knowledge database.

Lastly, we output the fallback phrase that was at the beginning of the list (but is now at the end) to the user as our reply, before looping back around again with exliza_loop/1.

With that, we our eliza can respond to phrase containing certain keywords, exit when asked, and reply with a fallback phrase if it doesn't understand what was said. Below I have put a small questions and answers type section containing a few of the problems that I had whilst writing this. I've also included the complete Prolog source code that this post is based on.

Common Problems

I had several problems whilst writing this program. I've included a few of them below.

My eliza fails when it doesn't understand something instead of outputting an error.

I found that I didn't get an error message if I included :- after the retract statement. Removing it made it output the error below which I was then able to solve.

I get this error when writing the fallback phrase bit:

ERROR: No permission to modify static_procedure Name/Arity

I'm certain that I put the dynamic name/arity at the top of my prolog source code, but it doesn't work.

I got this because I forgot the :- before the word dynamic. If you are getting this error, this isthe reason why.

Source Code

:- dynamic list_of_excuses/1.

list_of_excuses(['I see.', 'Very interesting.', 'Tell me more.', 'Fascinating.']).

eliza :-
    write('Hello! My name is eliza.'), nl,
    eliza_loop.

eliza_loop :-
    write('Eliza > '),
    read(Input), respond(Input).

respond(Input) :-
    member(Term, Input),
    member(Term, [ quit, exit, leave ]),
    write('Goodbye!').

respond([my,name,is,Name | _ ]) :-
    write('Hello, '), write(Name), write('! Pleased to meet you.'), nl,
    eliza_loop.

respond([my,Thing,is,called,Name | _ ]) :-
    write(Name), write(' is a nice name for a '), write(Thing), write('.'), nl,
    eliza_loop.
respond(Input) :-
    member(Animal, Input),
    member(Animal, [ cat, dog, fish, hamster, gerbil, snake, tortoise ]),
    write('You just mentioned your '), write(Animal), write('. Tell me more about your '), write(Animal), nl,
    eliza_loop.

respond(Input) :-
    member(Term, Input),
    member(Term, [ hate, dislike ]),
    member(Term2, Input),
    member(Term2, [ you ]),
    write(':('), nl,
    eliza_loop.

respond([ _ ]) :-
    retract(list_of_excuses([ Next | Rest ])),
    append(Rest, [ Next ], NewExcuseList),
    asserta(list_of_excuses(NewExcuseList)),
    write(Next), nl,
    eliza_loop.

(Try it on SWISH)

Website Updates Feburary 2016: Syntax highlighting updates & more

I was going to do test some coursework, but I got distracted and ended up updating a few things around here instead. Here's the list:

  1. Rewrote build system for CSS / Javascript minification
  2. Replaced layzr.js with [be]Lazy.js
  3. Updated Prism the syntax highlighting library I use around here

The only change you should notice is the syntax highlighting here on my blog. All the other changes are behind the scenes (to take adventage of HTTP/2).

Prolog source code is highlighted now:

% Get the nth element
% From https://starbeamrainbowlabs.com/blog/article.php?article=posts%2F134-learning-prolog-lab-10.html
nthelement(0, [ Head | _ ], Head).
nthelement(N, [ _ | Tail ], Result) :-
    N > 0,
    NRecurse is N - 1,
    nthelement(NRecurse, Tail, Result).

There are some nice additions to the syntax highlighting algorithm, too! The most noticeable are the line numbers. There are also some extra tooltips:


html, body { font-size: 100%; }
body
{
    font-family: sans-serif;
    background: linear-gradient(45deg, #b81831, #1a0871);
    color: rgb(187, 28, 59);
}

#some-element
{
    transform: rotate(86deg);
    animation 3s ease-in-out slidein;
}

I will likely update this post a few more times as I continue to test the new configuration.

Learning Prolog: Warm up for semester 2 with the cinema

The new learning prolog banner!

Learning Prolog is back, because apparently I am totally nuts and like to write long blog posts about the hardest programming language to use in existence. To kick off semester 2, we were given an old challenge: Write a cinema program that decides whether somebody can watch a given film or not. I remember this from my very first programming lab with Rob Miles - the first ever task that we were given was to build this exact program in C♯. Because Prolog is such a nasty and difficult language to learn, it has taken until now to learn all the concepts that you would need to write such a program.

In this post, I hope to guide you through the process of writing such a program in Prolog. To start with, here's an overview of what we will be building:

A Prolog program that will state whether or not a customer can see a movie depending on their age, the movie they want to see, and whether they have an adult with them.

We will need a few films to test this with. Here are the films that I was given in the lab:

Film Name Rating
How to Lose Friends and Alienate People 15
Death Race 15
Space Chimps U
The Chaser 18
Get Smart 12A

The first job here is to convert the above table into Prolog:

film('How to Lose Friends and Alienate People', 15).
film('Death Race', 15).
film('Space Chimps', 'U').
film('The Chaser', 18).
film('Get Smart', '12A').

Now we need some way to output the above so that the customer can see which films we are currently showing. Here's what I came up with:

all_films(FilmList) :-
    findall([ Film, Rating ], film(Film, Rating), FilmList).

list_films :-
    all_films(FilmList),
    list_films(FilmList, 0).
list_films([], _).
list_films([ [ FilmName, FilmRating ] | Rest ], Counter) :-
    write(Counter), write(' - '), write(FilmName), write(' - '), write(FilmRating), nl,
    NCounter is Counter + 1,
    list_films(Rest, NCounter).

As you should have come to expect with Prolog, the solution here is recursive. Firstly I define a rule to fetch me all the films with a quick findall/3. Then I define list_films/1 which calls all_films/1 to get all the films and passes them over to list_films/2, which actually does the work. I also have a counter here to keep track of the index of each film. This is important because we want to get the user to enter the number of the film that they want to watch.

Here's some example output of the above:

?- list_films.
0 - How to Lose Friends and Alienate People - 15
1 - Death Race - 15
2 - Space Chimps - U
3 - The Chaser - 18
4 - Get Smart - 12A
true.

This works by fetching all the films and loading them each into a list that contains their name and rating. These lists are then packaged into one big list, which is then spun through and outputted one by one, whilst incrementing the counter variable.

The next part of this problem is asking the user which film they want to see. Surprisingly, this isn't too tough.

ask_film(FilmNumber) :-
    write('Enter the number of the film that you would like to see: '),
    read(FilmNumber),
    true.

cinema_loop :-
    repeat,
    write('Welcome to our multiplex.'), nl,
    write('We are presently showing:'), nl,
    list_films,
    ask_film(FilmNumber),
    write('You chose option '), write(FilmNumber), write('.').

Here I define another rule to ask the user which film they want to see, and then define the main cinema loop. The main loop displays a welcome message, lists all the films that we are presently showing using the code we devised above, asks the user which film they want ot watch, and tells them which number they selected.

We are getting there, but telling the user which option they selected is a bit pointless, if you ask me. Let's upgrade it to tell us which film we selected and it's rating.

film_rating(FilmNumber, FilmRating) :-
    all_films(FilmList),
    nthelement(FilmNumber, FilmList, [ FilmName, FilmRating ]),
    write('You want to see '), write(FilmName), write(', which is a '), write(FilmRating), nl.

cinema_loop :-
    repeat,
    write('Welcome to our multiplex.'), nl,
    write('We are presently showing:'), nl,
    list_films,
    ask_film(FilmNumber),
    film_rating(FilmNumber, FilmRating),
    check_age(FilmRating),
    write('Enjoy the film!'), nl, true.

My code starts to get a little bit messy here (sorry!), but I've taken the cinema_loop/1 that we started above and upgraded to call film_rating/2. This new rule actually has a rather misleading name now that I think about it, but it's purpose essentially is to take a given film number and to return it's rating, whilst telling the user which film they selected.

film_rating/2 calls another rule that you might find familiar - the nth_element rule that I wrote in semester 1's last lab. GO and take a look at my other post if you are confused.

Now that we have that connector in place, we can start thinking about ratings. The rating system isn't as simple as it sounds when you start to think about it:

Rating Meaning
U Universal, suitable for all ages
PG Parental Guidance, suitable for all ages at parents discretion
12 No one younger than 12 can see this film
12A No one younger than 12 can see this film unless accompanied by an adult
15 No one younger than 15 can see this film
18 No one younger than 18 can see this film

Let's brack this down into chunks. In theory, we can do this with a single rule with 2 arities one for those rating that don't require the age of the customer, and those that do. We can write one part of the rule for each rating. Let's start with U:

check_age(FilmRating) :-
    FilmRating = 'U'.

Nice and simple, right? It succeeds if the film rating is 'U'. Let's move on. We can lump PG and 12A together if the customer is under 12 years of age:

check_age(FilmRating, Age) :-
    member(FilmRating, [ 'PG', '12A' ]),
    Age < 12,
    ask_adult(Adult),
    Adult = yes.

The above simple makes sure that the rating is either 'PG' or '12A', then it make sure that the customer is under 12, then it makes sure that the customer has an adult with them usng the rule below. If all of these comditions are met, then it succeeds.

ask_adult(Adult) :-
    write('Are you accompanied by an adult?'),
    read(Answer),
    member(Answer, [y, yes, yep]),
    Adult = yes,
    true.

If the user is 12 or over and wants to see a PG or a 12A, then we should let them through without asking them about an adult.

check_age(FilmRating, Age) :-
    member(FilmRating, [ 'PG', '12A' ]),
    Age >= 12.

Next we need to deal with the regular 12, 15, and 18 ratings. There are easy:

check_age(FilmRating, Age) :-
    not(FilmRating = 'PG'), not(FilmRating = '12A'),
    Age >= FilmRating.

We then need to connect the check_age/1 with the check_age/2. This is also fairly simple:

ask_age(Age) :-
    write('What is your age? '),
    read(Age).

check_age(FilmRating) :-
    ask_age(Age),
    check_age(FilmRating, Age).

If all else fails, then the customer mustn't be allowed to see the film. We should add another quick rule to tell the customer that they can't see the film before we are done:

check_age(_, _) :-
    write('Sorry, you can\'t see that film - try picking another one.'), nl,
    fail.

That completes the cinema program. Below you can find the source code for the whole thing that I based this post on. There are some unnecessary true.s floating around, but they are just relics from when I was debugging it and couldn't figure out what the problem was.

% Current films
film('How to Lose Friends and Alienate People', 15).
film('Death Race', 15).
film('Space Chimps', 'U').
film('The Chaser', 18).
film('Get Smart', '12A').

% Main loop
cinema_loop :-
    repeat,
    write('Welcome to our multiplex.'), nl,
    write('We are presently showing:'), nl,
    list_films,
    ask_film(FilmNumber),
    film_rating(FilmNumber, FilmRating),
    check_age(FilmRating),
    write('Enjoy the film!'), nl, true.

% Get all films
all_films(FilmList) :-
    findall([ Film, Rating ], film(Film, Rating), FilmList).

% Get the film with a given number
film_rating(FilmNumber, FilmRating) :-
    all_films(FilmList),
    nthelement(FilmNumber, FilmList, [ FilmName, FilmRating ]),
    write('You want to see '), write(FilmName), write(', which is a '), write(FilmRating), nl.

% Get the nth element
% From https://starbeamrainbowlabs.com/blog/article.php?article=posts%2F134-learning-prolog-lab-10.html
nthelement(0, [ Head | _ ], Head).
nthelement(N, [ _ | Tail ], Result) :-
    N > 0,
    NRecurse is N - 1,
    nthelement(NRecurse, Tail, Result).

% Check the user's age against the given film.
check_age(FilmRating) :-
    FilmRating = 'U'.
check_age(FilmRating) :-
    ask_age(Age),
    check_age(FilmRating, Age).
check_age(FilmRating, Age) :-
    member(FilmRating, [ 'PG', '12A' ]),
    Age < 12,
    ask_adult(Adult),
    Adult = yes, true.
check_age(FilmRating, Age) :-
    member(FilmRating, [ 'PG', '12A' ]),
    Age >= 12.
check_age(FilmRating, Age) :-
    not(FilmRating = 'PG'), not(FilmRating = '12A'),
    Age >= FilmRating.
check_age(_, _) :-
    write('Sorry, you can\'t see that film - try picking another one.'), nl,
    fail.

% Gets the user's film preference
ask_film(FilmNumber) :-
    write('Enter the number of the film that you would like to see: '),
    read(FilmNumber),
    true.

% Gets the user's age
ask_age(Age) :-
    write('What is your age? '),
    read(Age), true.

ask_adult(Adult) :-
    write('Are you accompanied by an adult?'),
    read(Answer),
    member(Answer, [y, yes, yep]),
    Adult = yes,
    true.

% Lists all films
list_films :-
    all_films(FilmList),
    list_films(FilmList, 0).
list_films([], _).
list_films([ [ FilmName, FilmRating ] | Rest ], Counter) :-
    write(Counter), write(' - '), write(FilmName), write(' - '), write(FilmRating), nl,
    NCounter is Counter + 1,
    list_films(Rest, NCounter).

Organise your code snippets with GistBox

Gistbox logo

As I have been progressing with my degree, I have found myself with an increasingly large library of reusable code. While this is a good thing as it means that I don't have to write the same functionality twice, I have been discovering that it is rather difficult to find the code snippet I want to use in any reasonable length of time - probably due to the absence of a meaningful organisational system.

Recently I found GistBox whilst scouring the internet for a decent solution. It lets you tag and organise the code snippets that you have uploaded to Github Gist. Now instead of hunting through past projects to find a piece of code I want to reuse, I can instead (in theory) just open GistBox and search that instead, assuming that I have gotten around to uploading that snippet to Github as a gist.

GistBox does have it's flaws (like a terribly uncustomizable code editor that doesn't let you switch between space and tabs), but all in all it's a huge improvement over my previous (non-existent) system. Now all I have to do is to move all my snippets over to it so that they are all in one place (assuming that I can find them).

Art by Mythdael